Too Deep, Too Shallow, or Just Right? The Key to Better Trigger Press”
Trigger Control Simplified: How Finger Placement Makes or Breaks Your Shot
ProLevel Guide to Trigger Control — Finger Placement, What Goes Wrong, and How to Fix It
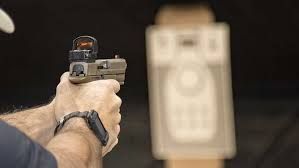
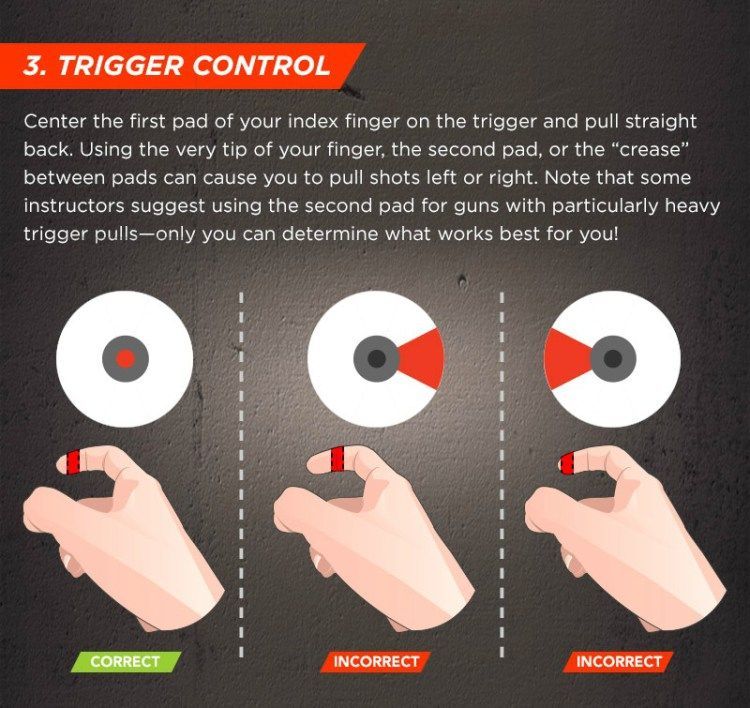
Trigger control is one of the single biggest determinants of accuracy and consistency. Small changes in where your finger contacts the trigger produce surprisingly large changes in where the gun shoots. This post focuses tightly on finger placement — how to place the pad of your finger on the trigger, what happens when it’s too deep or too shallow, and practical drills to fix it.
Short takeaway: place the pad of the index finger (the distal pad — not the joint) squarely on the face of the trigger, push straight to the rear with steady pressure. Anything else → torque, flinch, and wandering shots.
1) The ideal contact point — what “correct” looks like
- Use the pad (distal pad) of your index finger — the soft, fleshy area between the fingertip and the first crease.
- The pad should contact the center of the trigger face (or slightly higher depending on trigger geometry), so the force goes straight to the rear.
- Your finger should be relaxed but committed; the movement should be a controlled straight push, not a pull or a hook.
- The rest of your hand/grip should remain stable and not try to “help” the trigger press.
Why the pad? The pad gives a flat, repeatable surface that transmits straight-back pressure. Joints are pivot points — if you use them, you introduce angular motion and inconsistent leverage.
2) What happens when your finger is too deep (too far toward the first joint)
Description: the fingertip is tucked so the trigger contacts the finger at or past the first joint (proximal interphalangeal joint), or the finger is curled so the trigger rides into the fleshy base.
Consequences:
- Rotational torque — the trigger is pushed at an angle, rotating the gun in the shooter's hand (usually toward the support side). Shots will consistently group off-center.
- Inconsistent leverage — deeper placement often changes the effective mechanical leverage from shot to shot.
- Increased tendency to squeeze off-center — finger will tend to pull sideways as the larger joint area moves.
- Hidden flinch — the extra bulk in the finger can make the trigger feel further away, encouraging anticipation and a jerky “lurch” for fast shots.
Symptoms you’ll observe:
- Vertical or horizontal flyers that line up with the direction of the torque.
- Shots that move unpredictably when you try to speed up.
- The muzzle seems to “twist” during trigger press.
3) What happens when your finger is too shallow (only the fingertip touching)
Description: only the very tip (beyond the distal pad) contacts the trigger, or the finger touches with the nail or edge of the pad.
Consequences:
- Too little surface area / poor leverage — the fingertip has limited surface and the pressure tends to be applied with less control and more wrist motion.
- Tendency to jab or snap — small muscles at the fingertip produce abrupt, jerky pressure rather than a smooth press.
- Nail interference — if the nail contacts the trigger, it can cause the finger to slip or produce inconsistent pull.
- Less sight control during press — because the fingertip is weaker and less stable, your sights often move off target during the press.
Symptoms you’ll observe:
- Frequent jerky shots or vertical stringing.
- Inability to press smoothly on single-shot slow-fire.
- Poor recoil recovery (because press was uneven going into recoil).
4) Finger placement nuances by gun type
- Semi-automatic pistols: pad high and square on the trigger face. If your trigger is curved, place the pad where force is transmitted straight back. Try to avoid letting the knuckle or first joint contact the frame in a way that changes grip geometry.
- Revolvers: same rule — pad of the finger. Revolver triggers are longer and more curved, but using the pad still gives the best control.
- Long triggers / long reach guns: if you cannot reach the trigger without moving to a joint, consider adjusting grip, shortening the reach (bring the gun closer), or a professionally fitted trigger shoe—don’t sacrifice pad contact.
5) How to check your placement (quick checks)
- Dry check: point the gun in a safe direction, take your grip and press the trigger slowly. Watch the sight picture. If the front sight dips or moves sideways at the start of the press, your placement is off.
- Nail check: if you feel the nail press, reposition — you want pad-to-trigger contact.
- Paper test (slow fire): at close range (3–5 yards) fire slow, deliberate single shots. If your groups pull off in a consistent direction, interpret that direction relative to how your finger contacts the trigger (too deep usually pulls in one direction, too shallow another).
6) Drills to correct and reinforce ideal placement
All drills should be done safely: unloaded gun for dry-fire, use snap caps for live-action practice when indicated, and always treat the gun as loaded.
- Dry-fire sight-maintenance press
- Setup: Unloaded, safe direction, target at 3–5 yards.
- Task: Acquire sights, place finger on trigger pad, press straight back for 2–3 seconds until the trigger breaks, maintain sight alignment through the break.
- Goal: Smooth, straight trigger press with zero sight disturbance.
- Wall drill
- Setup: Gun (unloaded) pointed at a blank wall at arm’s length.
- Task: Slowly press the trigger while keeping the muzzle absolutely still relative to a mark on the wall.
- Goal: If the muzzle moves, adjust finger placement until the muzzle stays true.
- Ball-and-dot slow-fire
- Setup: Live-fire at 5–7 yards on a small dot. Start slow.
- Task: Press the trigger deliberately and allow full sight picture; focus on pad placement and straight-back motion.
- Goal: Tight, centered groups. Speed up only after consistency.
- Reset repetitions
- Press to break, let trigger reset only partially, then press again — focus on maintaining the same pad contact during the reset and follow-through. This builds repeatability under recoil.
- Mirror or video check
- Use a mirror or camera during dry-fire to inspect exactly where the trigger contacts the finger. Small adjustments are easy to spot visually.
7) Small gear and physical tips
- Nail length: keep index fingernails trimmed. Long nails interfere with pad contact and can change leverage.
- Trigger shoe / flat triggers: if your trigger geometry pushes your finger to the side, a trigger shoe (wider/smaller face) can help you get a consistent pad contact.
- Trigger reach: if you cannot get your pad on the trigger without slamming your hand forward, adjust grip or consider a different grip size/backstrap. Reach should be natural — don’t contort.
- Gloves: test your technique with the gloves you actually use; gloves change feel and placement.
8) Common myths and clarifications
- Myth: “You must put the first joint on the trigger.”
— No. Using the joint introduces pivot motion. The pad is repeatable and biomechanically superior. - Myth: “The fingertip is best for fine control.”
— No. The fingertip is weaker and tends to jab; the pad offers a more repeatable, smooth press. - Reality: Some elite shooters may deliberately adjust placement for very specific feel with certain triggers — but for 99% of shooters and training, the pad in the center is the correct baseline.
9) Troubleshooting: if adjustments don’t help
- Re-check your grip — a bad grip can mask trigger faults.
- Watch for anticipation/flinch — if you can’t press slowly without the gun jerking, add dry-fire repetitions and use a clicker or snap caps.
- Get an instructor’s eye — a short session with a qualified instructor will identify subtle issues faster than self-diagnosis.
10) Practice plan (30 days) — simple and effective
- Days 1–10: Daily 10–15 minutes dry-fire — slow press, wall drill, mirror check.
- Days 11–20: Add live-fire twice a week — 50 rounds focusing on single-shot slow-fire at 5–7 yards.
- Days 21–30: Introduce reset repetitions and controlled pairs; evaluate groups and make small placement tweaks. Keep nail length trimmed; take video once a week.
Quick checklist (carry on your phone)
- Pad of index finger — yes.
- Center of trigger face — yes.
- Nail trimmed — yes.
- Smooth straight press — yes.
- Dry-fire daily, live-fire twice/week — yes.
- Instructor check — scheduled?
Final note on safety and consistency
Trigger control is a habit built with thousands of repetitions. Prioritize safety first: always practice with unloaded guns during dry-fire drills, and use live-fire only in a proper range environment. Small, consistent daily practice on finger placement (the distal pad, centered) will dramatically improve accuracy and reduce flinch or torque-related misses.
